
Every spring, flower enthusiasts replant their gardens to bring beauty and life to their yards. If you have lilies in your garden, you may be wondering if you should transplant them when it’s time for a makeover.
Transplanting lilies is not complicated, but it can be intimidating if you’re not knowledgeable about how to do it safely and effectively. In this article, we’ll look at the very best methods for successfully transplanting your lilies in the springtime.

Here’s: Can I Transplant Lilies in the Spring?
You can transplant lilies in the spring. To make sure the lilies are transplanted safely and well, it is important to follow the right steps. This includes preparing the soil, digging up the lilies carefully, and replanting them in a new location with plenty of sunlight and watering.
The Importance of Timing When Transplanting Lilies
As with most plants, the timing of when you transplant lilies can be crucial to their survival and success.
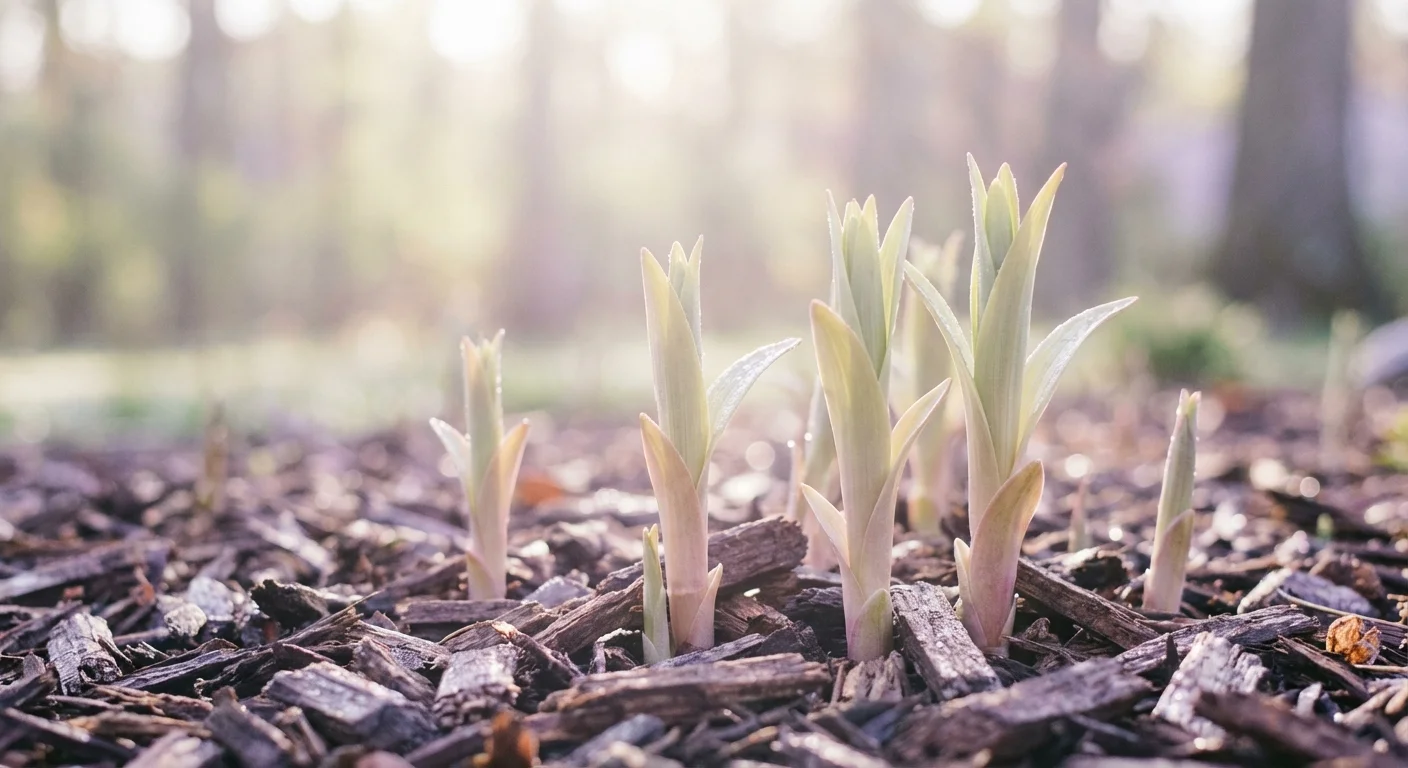
Lilies have a specific period of dormancy, during which they are not actively growing and are more tolerant of being moved.
This dormancy period typically occurs in the late fall or winter, after the lilies have finished blooming and the leaves have died back.
Transplanting lilies during their active growing season (i.e., spring or summer) can stress them out and potentially kill them.
So, if you want to transplant your lilies in the spring, you’ll need to be mindful of their stage of growth and the weather conditions. Let’s take a closer look at when and how to transplant lilies in the spring.
Spring as a Suitable Time for Transplanting Lilies
While it is generally best to transplant lilies during their dormant period, it is still possible to transplant them in the spring under certain circumstances.
If the lilies were recently purchased or received as a gift and have not yet been planted, transplanting them in the spring can be a good option.
This was the case for me last year: I received a beautiful bouquet of Easter lilies as a gift, and rather than letting them wilt and die, I decided to transplant them into my garden. With a little care and attention, they flourished and provided a stunning display of white blooms all summer.
Another situation where you may be able to transplant lilies in the spring is if the lilies have already started to emerge from dormancy and the weather is cool and moist. In this case, the lilies will have already begun to put out new growth, but they will still be in a relatively early stage of development and will be more tolerant of being moved.
Just be sure to avoid transplanting lilies when the weather is excessively hot or dry, as this can further stress them out and increase the risk of failure.

What to Consider Before Transplanting Lilies in the Spring
When transplanting lilies in the spring, it’s important to make sure you’ve taken all the necessary steps beforehand. First, check the roots for any signs of disease or pests, and if you find any, treat them with the right pesticide before transplanting.
Secondly, select a new spot with moist, well-draining soil that has plenty of organic matter and ample sunlight. It’s also a good idea to ensure that the new location isn’t too far away from where the lilies currently are; they may not survive a long distance transplant.
Finally, once all the other factors have been considered, you’ll be ready to begin your transplant, making sure to keep the soil around their roots intact so as not to disturb them too much during this process! With these tips in mind, you can rest assured that your lilies will be transplanted safely and successfully this spring!
Steps for Transplanting Lilies in the Spring
If you’re ready to transplant your lilies in the spring, there are certain steps you’ll need to take so the process can go smoothly.
First, you’ll need to choose a location that is suitable for lilies. Full sun or partial shade, with well-draining soil and enough space for their size and type, is ideal.
Then you’ll need to prepare the soil by loosening and enriching it with compost, peat moss, or other organic matter.
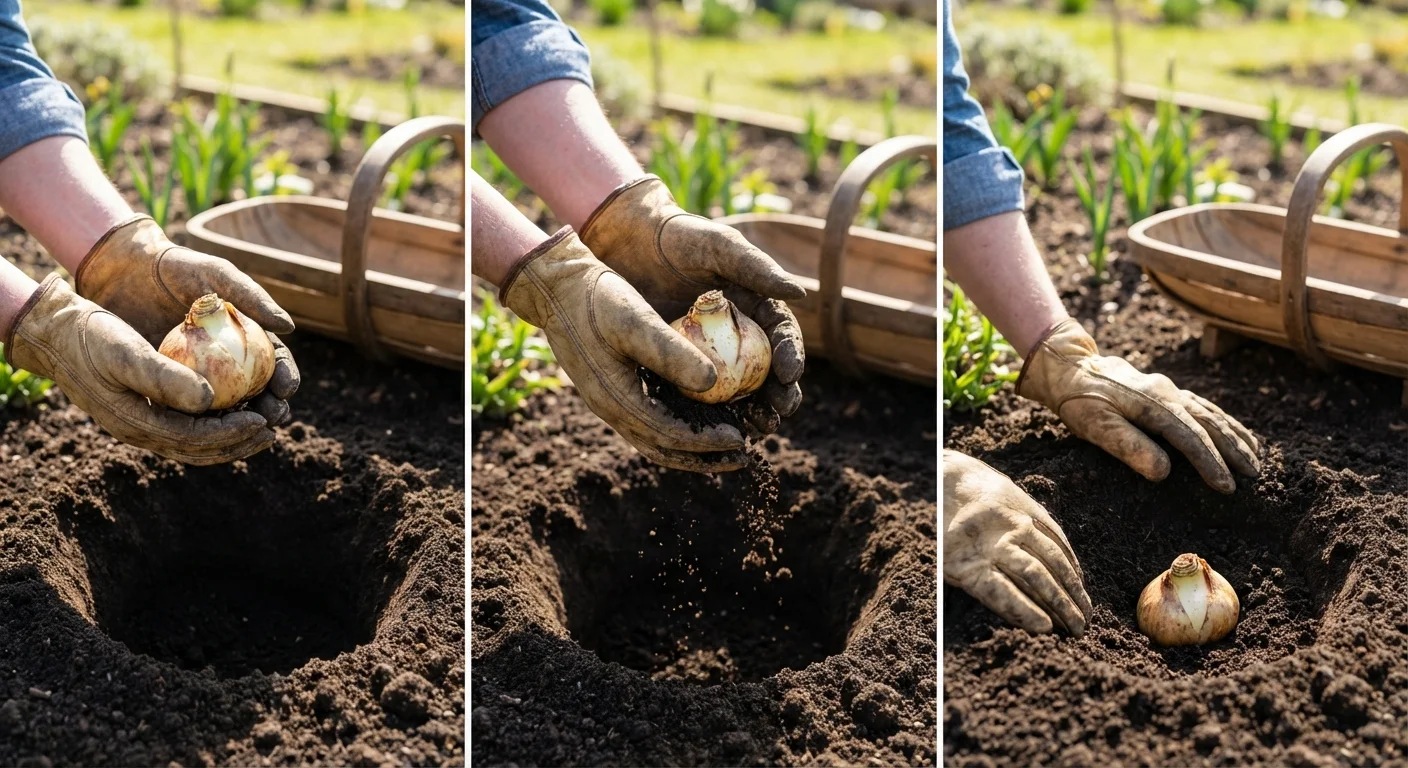
Next, use a garden fork or trowel to carefully dig up your lily bulbs, making sure not to damage them too much.
Once dug up, plant each bulb at the same depth they were previously growing at (pointy end upwards!), and water them well after planting. This will help them get settled into their new home quickly!
Follow these steps carefully, and your lilies should be happily transplanted in no time!
How to Choose a Good Location for Lilies
Lilies love the sun and do best when they receive at least 6 hours of direct sunlight each day, so make sure the area you choose has plenty of sunshine.
Pick an area that offers some degree of protection from strong wind gusts; lilies are quite delicate flowers and can easily be damaged by high winds. Planting them close to a wall or hedge can provide them with some shelter from any strong winds.
What Soil Conditions Are Ideal for Lily Transplanting?
The ideal soil for lilies should be light, well-draining, and packed with organic matter such as compost and aged manure. Additionally, the soil’s pH should sit between 6.0-6.8 in order to create a slightly acidic environment for the plant.
To ensure that your lilies have enough root growth in their new home, you’ll want to till the soil up to a depth of six inches or more. If your soil is too sandy, consider adding some peat moss or compost to improve its texture and water-holding capacity.
Make sure that the soil is not compacted when transplanting them; if it’s too hard, there won’t be enough moisture or space for their roots to spread out properly.
To make sure that you get all of these details right, testing your soil before transplanting lilies is highly recommended. This way, you can adjust any of the factors if needed and give your lily its best chance of flourishing in its new home!

How to Water and Fertilize Newly Planted Lilies
Now that your lilies are in the ground, the first step to successfully nurturing them is to make sure they get enough water and fertilizer.
To do this right, start by deeply and thoroughly watering your lilies—especially during the early stages of growth—and then make sure to keep up a regular watering schedule. It’s also important to be mindful of overwatering, as it can lead to root rot.
In addition to regular watering, you should also fertilize your lilies twice a year: once in the spring and once in the fall. Make sure that you choose a balanced, slow-release fertilizer for optimal results.
Watch out for any signs that suggest your lilies may not be doing well despite all that effort. When leaves wilt or turn yellow, it’s usually because they aren’t getting enough water or nutrients, so keep an eye on them and adjust their care as needed.
Your newly planted lilies should reward you with long-lasting beauty if properly cared for!

How Much Space Should Be Allotted for Each Lily Plant?
When transplanting lilies, proper spacing is key. Each lily plant should be planted at least 8–12 inches apart to allow enough space for their roots to spread out and the plant to grow.
If you are generous in your spacing, the hole you dig must be 4-6 inches deep and quite wide—as much as 8–12 inches wider than the bulb itself. The more space allocated per plant, the better they’ll be able to take up nutrients and reach their full potential.
Also, giving each lily enough space will cut down on the chance of disease and other problems that can happen when plants are too close together.
All in all, give your lilies plenty of wiggle room by providing a minimum of 8–12 inches of space between every plant for optimal health!

Common Pests and Diseases That Can Affect Transplanted Lilies
Common pests and diseases can be a problem for transplanted lilies. One of the most common is the lily beetle, which is a small, red beetle with black legs. These insects are capable of causing significant damage to lilies if left unchecked.
To protect your plants from these bugs, you should inspect the plants on a weekly basis and pick off any adult beetles that may be present.
Fungal diseases such as yellow spots on leaves, brown patches, and wilting foliage can also affect lilies. If these things happen, treat the plant with the right fungicide according to what the manufacturer says to do.
Additionally, aphids, slugs, and snails can also feed on lilies, but these pests can normally be kept at bay through regular watering and fertilizing. In cases of severe infestations, you may need to use a natural insecticide to get rid of them.
Before transplanting your lilies in the spring, it is important to research any additional pests or diseases that could have an effect on your plants so that you are well prepared for any issues that might arise.

Tips and Tricks for Successfully Transplanting Lilies in Spring
To give your lilies the best chance of surviving and thriving after being transplanted in the spring, here are a few tips to keep in mind:
- Make sure that you select the perfect spot for your lilies—one that gets plenty of sunlight and has good soil drainage.
- Closely related is the fact that it helps to check the pH levels of the soil before you transplant. Lilies prefer acidic soils, so if yours isn’t already acidic, then it might be worth taking some measures to make it so.
- When you’re ready to plant your lilies, take special care when digging out the hole; be sure it’s big enough for all the roots. When putting them inside, loosen up any surrounding soil and make sure they feel at home there.
- When you’ve placed them in their new spot, give them a good watering. This will help settle their roots and get them off to a great start!
- Keep the lilies away from extreme temperatures (such as frost or heat).If the weather is still cool and frosty, cover the lilies with a layer of mulch or burlap to protect them from the cold. If the weather is excessively hot, provide some shade for the lilies by using a sunshade or planting them in a partially shaded area.
- Fertilize the lilies according to the specific needs of the species. Most lilies benefit from a balanced fertilization regimen (e.g., 10-10-10 or 20-20-20) applied once or twice a season. Some lilies, such as Asiatic and Oriental lilies, may benefit from an additional boost of phosphorous, which can be provided through a fertilization regimen high in phosphorous (e.g., 10-20-10) or by adding bone meal or rock phosphate to the soil.
FAQs
How Long Does It Take for New Lily Plants to Grow After Transplantation?
Transplanting lilies can be a delicate process, and proper care of the plants is a must to ensure they flourish in their new environment. It typically takes between two to three weeks for newly transplanted lilies to successfully establish themselves after transplant.
In order for your lilies to become firmly rooted and grow strong, you should water them deeply once a week and make sure they get plenty of sunlight—at least 6 hours if possible. Additionally, it’s important that you fertilize them regularly during this time, as this will assist with the establishment process significantly.
With the necessary TLC given to your newly transplanted lilies, in two to three weeks’ time you will likely experience beautiful blooms as a result of your efforts. So take comfort knowing that successful transplantation isn’t too far away!
Alternative Options for Transplanting Lilies in the Spring
For those of us who can’t transplant lilies in the spring, there are plenty of alternative options to consider.
- One great method is to divide the bulbs into smaller groups and plant them in different parts of your garden. This easy and cost-effective way of breathing life into an overcrowded lily bed, or even creating an entirely new one, is a surefire way to get more blooms out of your garden.
- Or you can try something new and exciting by planting lily seeds! Planting seeds directly in the ground or starting them indoors and then transferring them outdoors are great ways to personalize your garden with different varieties while having more control over the growing conditions.
Whichever approach you take, you’ll soon be enjoying beautiful lilies in your very own garden!
Conclusion and Summary of Key Points
Transplanting lilies in the spring can be a great way to add color and life to your garden. If done correctly, lilies can thrive and add beauty to your outdoor space for years.
To ensure success, it is crucial to take into account all the key points related to transplanting lilies in the spring. Timing is essential, as vegetation needs enough time before winter sets in; the soil should be well-drained with a neutral pH; and plenty of water needs to be supplied during the bloom season and fall dormancy period.
Overall, if you take care of your lilies properly, moving them in the spring can make your garden look better for many years and be a fun experience for everyone involved.